This is the first of a series of three blogs examining methods of tolerancing plastic moulded parts using various International Standards
and Tolcap.
Tolcap enables engineers to allocate process capable tolerances to any design characteristic at the
early stages of design and way before production starts.
Tolcap covers over 80 manufacturing processes, and one of the most used and most demanding
on designers is injection moulding of plastics.
Why is that? Well to start with ‘plastic’ means any one of
‘numerous organic synthetic or processed materials that are mostly
thermoplastic
or
thermosetting
polymers of high molecular weight’
*.
These polymers can be amorphous or crystalline in form.
Further, they may or may not, be filled with glass fibres or other substances.
The plastic
injection moulding process involves
‘melting plastic pellets (thermosetting / thermoplastic polymers) that once malleable enough,
are injected at pressure into a mould cavity, which fills and solidifies to produce the final product’
†
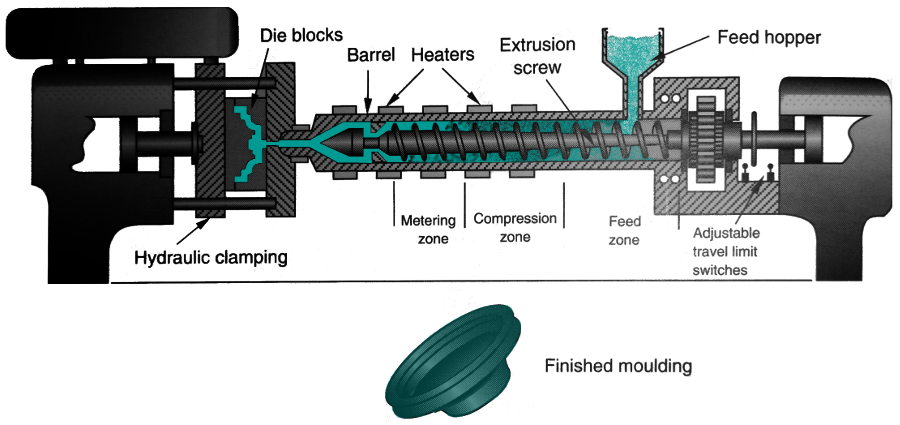 Injection Moulder (**)
One big issue is that both during the process, and after the parts have been ejected from the mould, the plastic shrinks -
typically by between 0.4% and 3%, although it can be less or more, depending on the material.
This shrinkage can vary along and across the part and its features.
We will look at various standards later in the blog, but even in setting up
tolerance grades for plastics,
ISO 20457
and
DIN 16742
(its progenitor) found the need to ‘cut and paste’ ever wider tolerance bands from the standard tolerance grades as dimensions increase.
Clearly moulding plastics is not a simple process,
and as a designer you will need to find a competent supplier and work closely with them through the design process,
designing in sympathy with the process and material as far as your requirements allow.
But how can you get started?
How can you get the first stages of your concept firmed up with plastic components that are going to be capable
- or at least feasibly capable with most of the issues identified?
A suggested first step, particularly if you don’t know much about the materials and the process is to go surf the internet.
Many manufacturers in particular have posted really useful introductions,
tutorials, and lists of the materials and their properties - it makes sense to get an overview and find some helpful sites up front.
Tolerancing with DIN 16901
You can anticipate I will show you how to tolerance your design using Tolcap.
But we mentioned standards, and many designers use them.
DIN 16901
has been withdrawn and replaced by DIN 16742 and ISO 20457,
but it is well tried and trusted by many as well as being simpler to apply, so let’s start there.
To find a tolerance for a particular dimension on a part, first specify the material.
As an example let’s assume we are specifying
ABS.
We find the materials row in Table 1 of the standard and we are using unfilled material.
Table 1 specifies three tolerance groups:
- Column 4: General tolerances
- Column 5: Series 1 - tolerances that can be compiled without special measures
- Column 6: Series 2 - tolerances that require more extensive measures in production
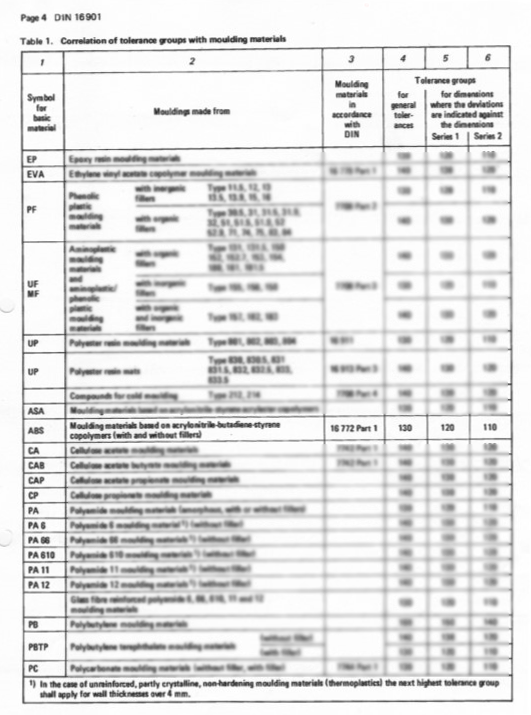 DIN 16901 Table 1 ABS
Column 4, General Tolerances, is applicable where we have not specified a tolerance against the dimension.
The standard provides a tolerance to put some reasonable bounds on a dimension that cannot be too important to us.
We are unlikely to be that concerned about process capability,
but if we did consult Tolcap, we would expect the predicted process capability would be a comfortably large number.
Where we do specify a tolerance,
we will hope that we can meet our fit and function requirements with a tolerance greater than or equal
to the tolerance specified in column 5, Series 1, because that can be complied without special measures.
If we have to go to Series 2, in column 6, then these tolerances may require more extensive measures in production:
we should identify them as special characteristics and discuss with the supplier what it might cost to achieve the tolerance process capably.
If we need even tighter tolerances, there is always the Precision Engineering group (see Table 2),
but this probably means a fine-tuned single impression mould tool with consequent high maintenance, shorter life and even higher costs.
Whichever group we choose, hopefully that for Series 1 which is 120, we find the appropriate row in the lower half of Table 2:
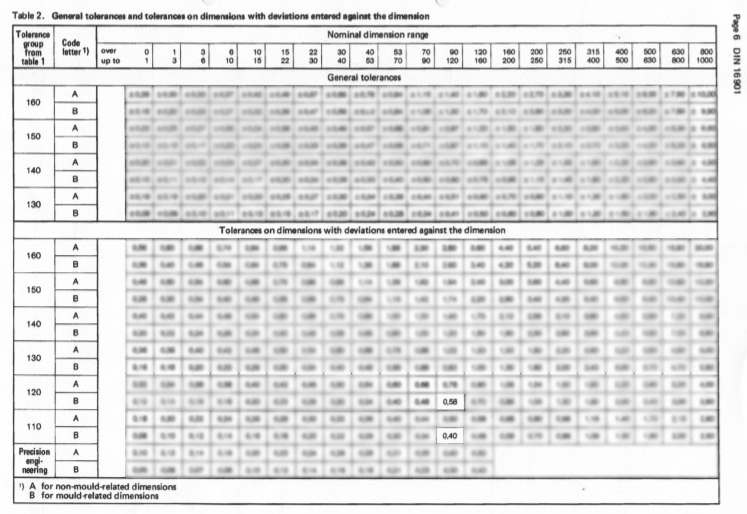 DIN 16901 Table 2 120
- and read off the tolerance from row A or B depending whether the dimension of interest is across a parting line
or within one cavity of the mould.
Let's say our part has a nominal dimension of 100mm and is not across a parting line.
Looking down the column for 90 - 120 mm and referring to row 120 B, we find DIN 16901 Table 2 suggests we need to allow a tolerance band of 0.58mm -
which balancing the upper and lower divisions of the band is equivalent to ± 0.29mm.
We note that if we requested the supplier to take ‘more extensive measures in production’ as the standard has it,
it may be possible to achieve the tolerance band from row 110 B: 0.40mm which again we can express as ± 0.20mm.
Had we looked at some other materials on Table 1 of the standard, we would have seen that ABS takes us to tighter tolerance groups than, for example,
Polyamides (Nylon) which indicate Tolerance Group 130 rather than 120 for Series 1 tolerances, or
unfilled Polyethylene or Polypropylene which take us to Tolerance Group 140.
Using DIN 16901 is a straightforward procedure.
But apart from the question of whether the dimension of interest is across the parting line,
the standard does not set any other effects of the geometry of the part as conditions on the specified tolerance.
Above we mentioned shrinkage of the part, and the standard does make the tolerance conditional on the manufacturer taking account of process factors,
but nowhere is the designer tasked with considering process issues.
Tolerancing plastics with Tolcap
††
The Tolcap approach addresses this aspect.
Using Tolcap to tolerance the above example, select the ‘Plastic Moulding’ Process Group
and then ‘Injection or Compression Moulding ABS, EPOXY, PBTP (filled), PC, PESU’.
 Select plastic moulding processes on Tolcap
Rather than estimating the process capability for a particular tolerance, let's obtain a capable tolerance;
so click on the
‘Cpk’
tab and enter 1.33 as the ‘Target Cpk’.
Enter the dimension of interest and click ‘Calculate’:
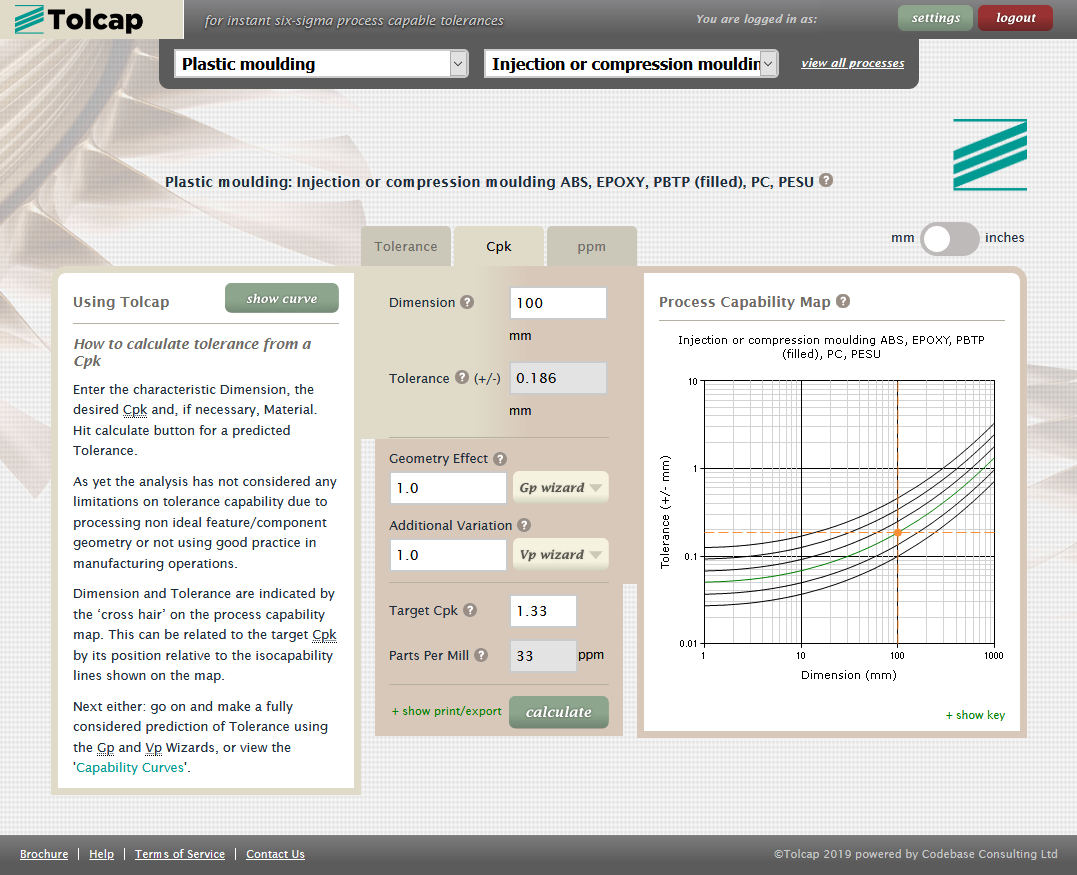 Tolcap: Moulding ABS, target Cpk = 1.33
Notice that the ‘cross-hair’ showing the dimension and tolerance on the map has jumped onto the green line showing
the Cpk = 1.33 contour on the map.
The capable tolerance for a dimension of 100mm is ± 0.186mm,
which is close to the ± 0.2mm we found from DIN 16901 row 110B above.
Indeed the map is a good fit to the 110 B Tolerance Group:
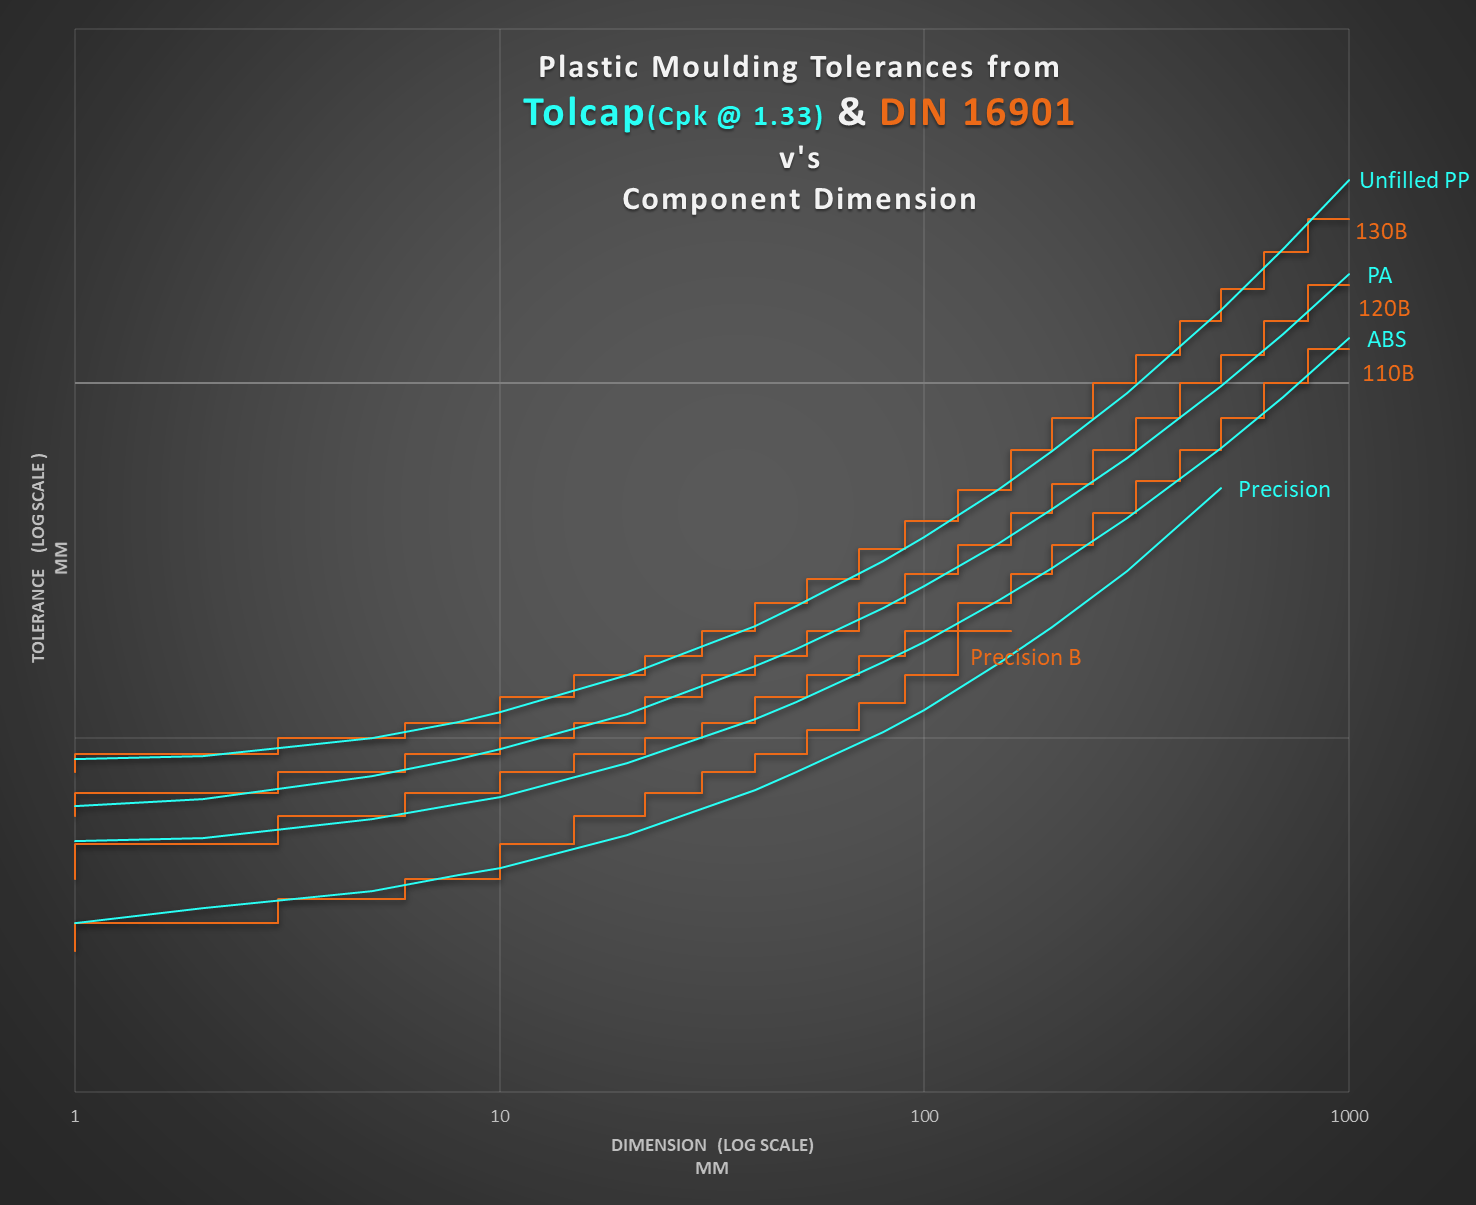 Comparison of Tolcap plastic mould, Cpk = 1.33, tolerance suggestions with tolerances from DIN 16901
- it should be - the standard did inform our construction of the map!
Likewise the Tolcap map for materials including
PA (Polyamides e.g. Nylon) track Tolerance Group 120B,
and the map for unfilled
PP (Polyethylene or Polypropylene) tracks Tolerance Group 130B.
These maps represents the best case situation for the process and material
- the most favourable part geometry together with a design in sympathy with the process.
If your design has no geometry or additional variation issues, the supplier should be able to achieve this tolerance.
If there are issues and you do need to ask the supplier to take ‘more extensive measures in production’,
we can assume they are trying to compensate for, or offset, these issues
- but it is difficult to see how they will get much better than this best case situation.
To illustrate this in our example we can go through the Geometry and Process Wizards on Tolcap and select some issues we may well encounter.
Tolcap's ‘Wizards’ allow us to select less favourable part geometry and processing conditions.
On our Gp, Geometric Effect, Wizard we could select some geometric issues
- perhaps our part has slender regions that could cause some deflection during cooling,
and we are overmoulding,
which we count as an additional set-up operation:
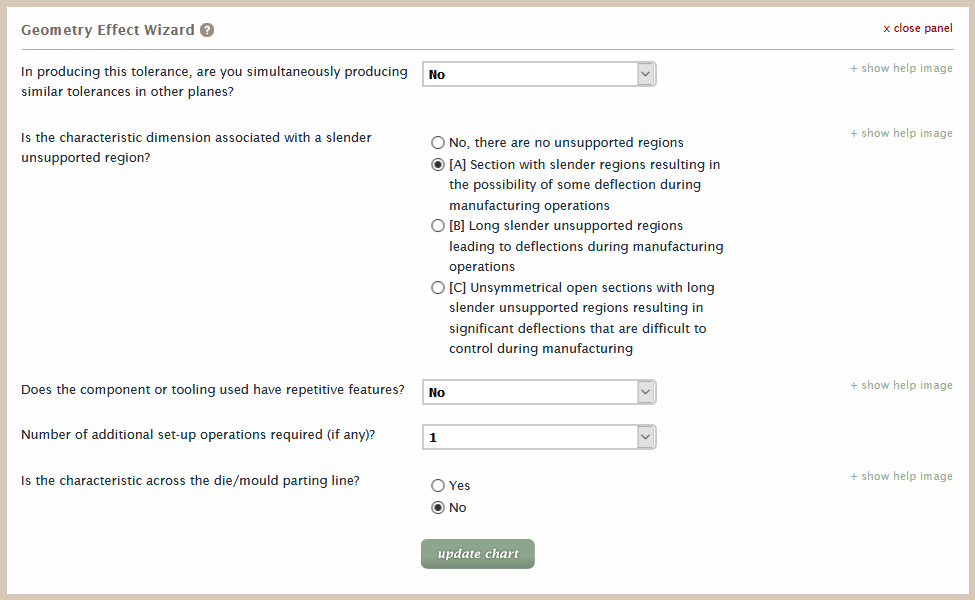 Tolcap Geometry Effect, Gp, Wizard
- now Tolcap returns a capable tolerance of ± 0.233mm:
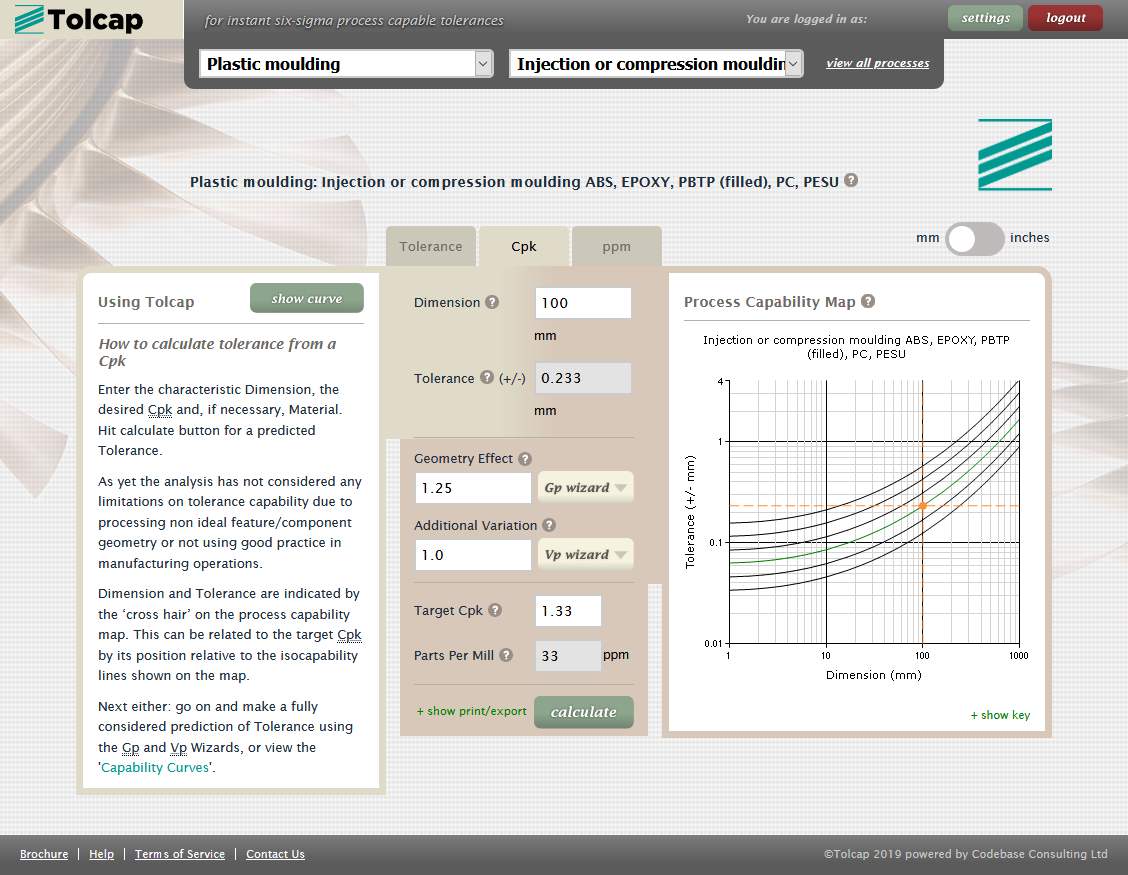 Tolcap: Moulding ABS, target Cpk = 1.33 with Gp Wizard influence
On the Additional Variation, Vp, Wizard we are aware that the dimension of interest is on a rib
and the ribs are not ideally balanced on the part,
so we click the appropriate button in the Vp Wizard:
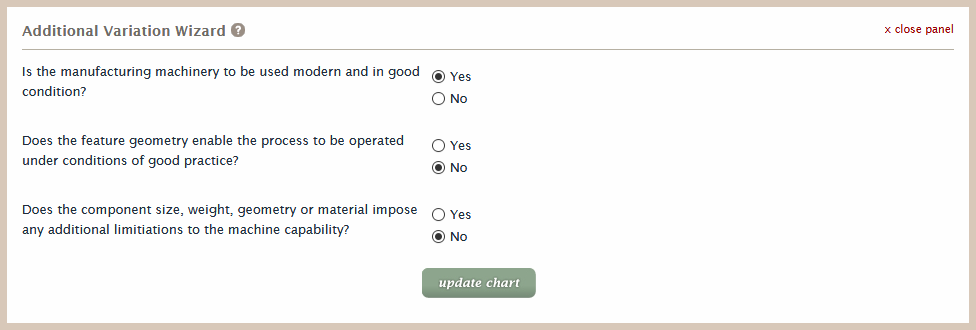 Tolcap Additional Variation, Vp, Wizard
- now the predicted capable tolerance grows to ± 0.349mm:
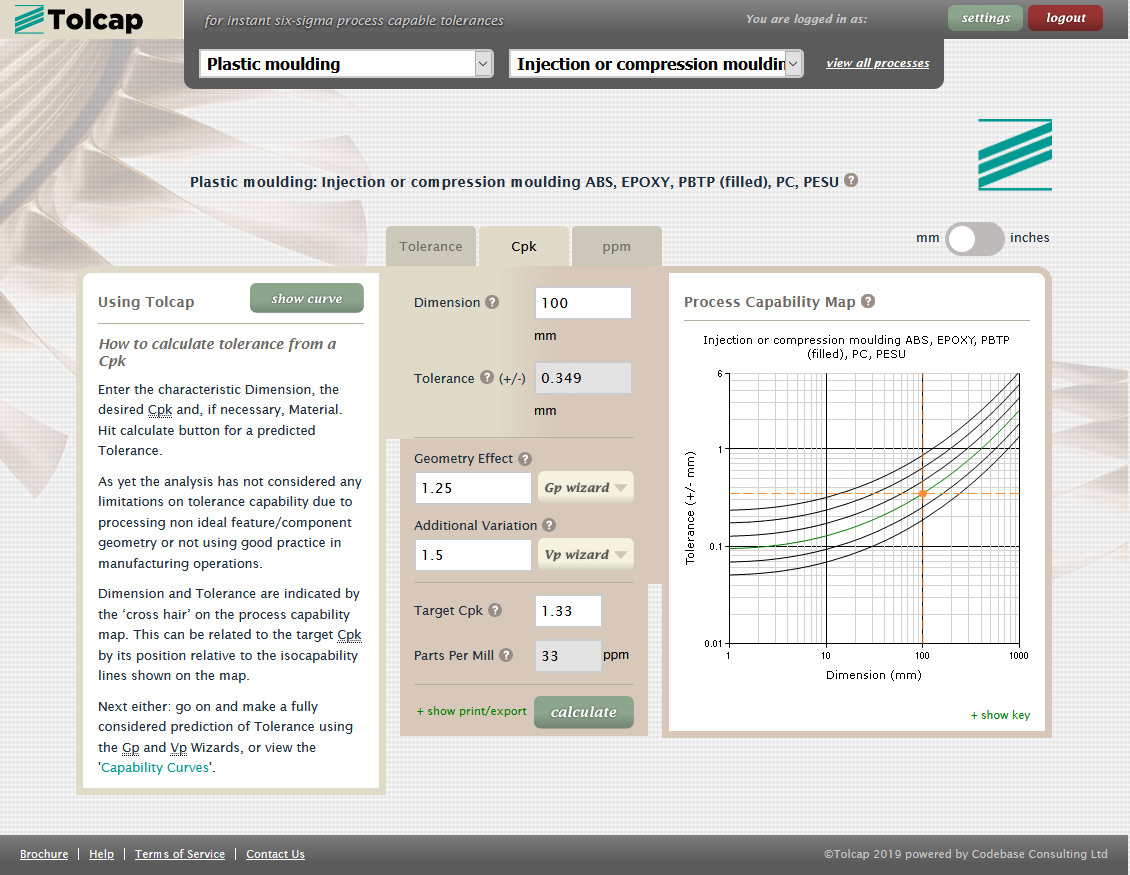 Tolcap: Moulding ABS, target Cpk = 1.33 with Gp and Vp Wizard influence
Note that the DIN 16901, Series 1, tolerance with no ‘more extensive methods’ ( ± 0.29mm)
accommodates one or both of the part geometry effects we identified using Tolcap, or indeed the additional variation effect on its own,
but not all three effects: but with a design with that many issues, maybe that’s not surprising.
We hope this shows that Tolcap gives a tolerance based on the part design:
wider tolerances to cope with issues, narrower if there are fewer or no issues.
All that said, if the fit or function under consideration do not necessitate a tighter tolerance,
you should of course relax the specification to what you need: but more often you are looking for the tightest tolerances you can get!
Next ...
Geometry and process issues related to plastic moulding are explored further in a later blog post,
Geometry and Process Effects.
But my next blog post,
Tolcap or ISO 20457 / DIN 16742?,
asks what should you do if the material you are moulding is not listed in DIN 16901
- and this leads directly into comparing the Tolcap approach with the newer standards DIN 16742 and ISO 20457.
Notes
*
From the plastic definition in the Merriam-Webster online dictionary.
†
From the discussion of plastic injection moulding on Protolabs website.
**
Process Selection – from Design to Manufacture
K G Swift & J D Booker
Publisher: Butterworth Heinemann, London, 2003
††
Not currently a Tolcap user?
Sign up for a months, no committment, free trial.
Written by:

Richard Batchelor MA, MBA, CEng, FIEE
Richard is a founding member of the Capra Technology team.
Thanks to Ian Maynard CEng MIMechE for his support in writing this blog
(www.IanMaynardCEng.com).
Related blogs
‘The Tolcap Rough Guide to Tolerancing Plastic Mouldings’ series (Dec 2019):