We are sometimes asked about geometric tolerances. While Tolcap gives sound estimates of
process capability for straightforward tolerances, this is because we have extensive series
production data for the maps we publish. We don’t have such data for geometric tolerances such
as flatness, roundness, etc., so we won’t compromise the Tolcap data base by publishing maps for
them.
We are sorry we cannot publish maps for positional tolerancing, because that is fundamental to
geometric dimensional tolerancing (GDT) and the ‘maximum material condition’ problem

To explain this problem, suppose you have one part with two studs which are to fit into two holes
in another part. How do you dimension and tolerance the parts? In the maximum material
condition, the holes are at their smallest and the studs at their largest. Think of the outside
dimensions of the studs and holes: the maximum distance apart of the centres of the studs plus the
maximum diameter of the studs must be less than the minimum distance apart of the centres of the
holes plus the minimum diameter of the holes. But at the same time, think of the inside
dimensions: the minimum distance apart of the centres of the studs minus the maximum diameter
of the studs must be greater than the maximum distance apart of the centres of the holes minus
the minimum diameter of the holes. OK, the nominal distance apart of the holes should be
specified the same for both parts, but the difference in the nominal diameters of the holes must
accommodate the range in the tolerance stack up. The stack up comes down to the tolerance on
the hole or stud diameters and the positional tolerance or distance between the centres. Tolcap
can help with the diameters, and maybe provide a solution for the studs * (see below) - but we
don’t yet have the data for a positional tolerance map to apply to the holes.
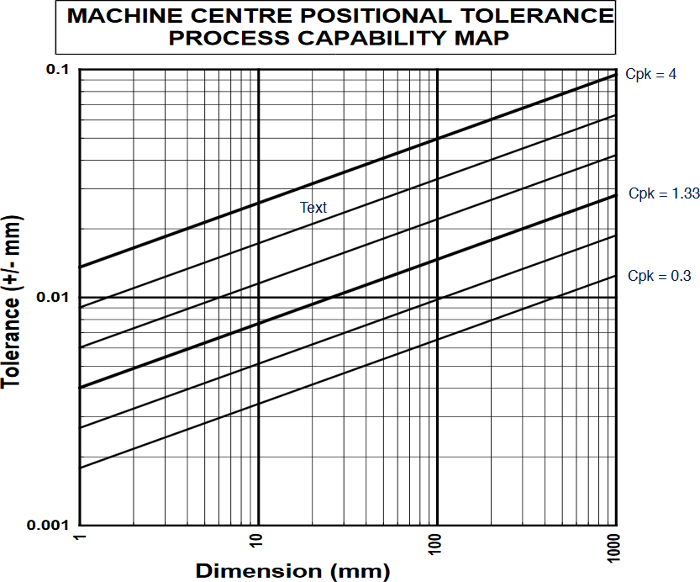
We have a start: the map here reflects our best shot at the machining centre positional tolerance
considering just the repeatability of a machine tool moving from one centre to another. (This has
been published: see
K.G.Swift & J.D.Booker Process Selection from Design to Manufacture,
Butterworth Heinemann 2003, page 138 in this second edition.
)

What we don’t have is data on other factors, such as the ‘jump’ or jitter when the cutting tool (drill)
meets the surface of the part.
We have algorithms for generating maps from data of course, and this is a case where we would
be delighted to work with our clients who could provide data to generate a positional tolerance
map.
* I said Tolcap might provide a solution for the studs: if the studs were cast or milled, then we could
use Tolcap to find the capable tolerance for the outside dimension of the studs, for the inside
dimension we could then find capable tolerances for the diameters and from these the positional
tolerance for the centres. It depends on the manufacturing process. The problem area is the
positional tolerance of the centres of the holes.
Written by:

Richard Batchelor MA, MBA, CEng, FIEE
Richard is a founding member of the Capra Technology team.